Implicit FrontEnd for Salesforce User Guide
Installation Guide
Supported Platforms
- Salesforce: All Editions
- Exchange 2007 - 2019 & Zimbra
- Outlook 2010 - 2019 & Office 365
- Tablets: Surface / Windows 10
Preparing for the installation
Before running the Outlook Add-in installation please make
sure of the following:
- Your computer is connected to the network and you are able to browse the internet
-
If you are connected via a proxy, make sure that your Internet Explorer browser is
properly configured to use the proxy as the installer will need to download and
install several Microsoft components from the Microsoft site
-
Close any open Office applications.
Installing the Pre-Requisites Components
Before installing the Outlook add-in, the installer will
check the desktop for components that are required for Outlook add-ins to work
and install/upgrade any missing component:
-
.Net Framework 4.x client profile (Outlook 2010 / 2013 / 2016 / 2019)
-
Microsoft Sync Framework 2.0 Core Components and Provider Services
-
Microsoft SQL Compact Edition.
-
Microsoft Visual Studio for Office second Edition Runtime
You will first need to accept the End User License Agreement
(EULA) for each of the components.
![]()
![]()
Sync Framework License Agreement
![]()
![]()
SQL Server Compact Edition and VSTO License Agreements
Upon accepting all EULAs, the installer will download and
install each of the components
![]()
Installing pre-requisites
Installing FrontEnd Outlook Add-In
Once the installation of the pre-requisites is completed, the installer will
begin installing the Implicit FrontEnd Add-in.
![]()
Installing the Implicit FrontEnd Outlook Add-In
Click Next to continue. You will be prompted accept the
Implicit FrontEnd EULA:
![]()
Implicit FrontEnd End User License Agreement
Next, you will be prompted to select the installation
folder. By default the installation folder will be set to: \Program
Files\Implicit\Implicit FrontEnd. Choose Browse to select a different folder.
Then click 'Next'.
![]()
Installation Folder
Next, the installer will be prompt you to confirm the
installation and start copying the files:
![]()
Confirm Installation
![]()
Installation Complete
Licensing and Login
Upon Launching
Outlook for the first time after install, you'll be prompted to enter the Implicit
FrontEnd license key:
![]()
Followed by FrontEnd login dialog:
![]()
Enter the Salesforce server URL and the user name and password that you use to login to Salesforce.
The URL by default is set to: https://login.salesforce.com.
Role-based Configuration
If your Salesforce administrator has published an Implicit FrontEnd
configuration for your role, you will receive the notification below:
![]()
Role Configuration
When the role is selected, FrontEnd will apply the configuration for that role,
skip the settings and go directly to perform the initial sync with Salesforce.
Note: If you are a Salesforce administrator, you will have the
option of skipping this step and going directly to settings:
![]()
Skip Configuration
If a configuration was detected for you role, FrontEnd will
apply this configuration, skip these settings and go directly to perform the
initial synchronization. Otherwise,
you will be prompted to select the Sync configuration.
Sync Configuration
Tethered Vs. Non-Tethered Mode
![]()
The first decision you need to make when configuring
synchronization is whether to use Tethered or Non-Tethered mode
for contact synchronization. This mode determines how contacts are synced from
Salesforce to Outlook and how related records are accessed from within Outlook.
In Tethered Mode, contacts are not synced from
Salesforce to Outlook during the initial sync phase. When FrontEnd requires
information about a contact or any of its related records, it will perform a
real-time search on Salesforce to retrieve the contact information and all of its
relationships. The contact will then be synced to Outlook so next time, the
information will be immediately available. This is what we refer to as 'Sync on
Demand'.
In Non-Tethered Mode, contacts will be synced from
Salesforce to Outlook depending on which contacts were marked on Salesforce for
synchronization with Outlook. In this mode, when FrontEnd requires information
about a contact, it will search in Outlook and present the information directly
from Outlook. If the contact is not found in Outlook, FrontEnd will prompt you
to search for the contact in Salesforce and, if found, sync it to Outlook or otherwise
create a new contact.
Each mode has pros and cons to consider but the decision is
primarily driven by the amount of contacts that users may need to sync to their
Outlook. It's important to understand that there are two independent
synchronization processes running at the same time. Outlook synchronization
with the Exchange server and Outlook synchronization with Salesforce. Therefore,
its highly recommended to keep the number of contacts to a reasonable amount
and not exceed several thousands contacts in your Outlook contact folder.
-
If you have a large amount of contacts in Salesforce that are not
assigned to specific users and users may end up synchronizing thousands of
contacts to their Outlook - choose Tethered Mode. You may sacrifice
performance by having to search for contacts on the server in real-time but you
will certainly gain performance by keeping the amount of contact to a reasonable
number.
-
If you don't have a large amount of contacts to sync per user,
choose Non-Tethered Mode. FrontEnd will sync theses contacts during the initial
sync phase but once that's done, it will only sync new/modified contacts which
will not have any significant impact on performance. Having synced these
contacts to Outlook will eliminate the need to constantly search for them on
Salesforce and the email side panel will be able to display the information
instantly.
Also, please be aware that the behavior of the side panel also
depends on whether Tethered mode or Non-Tethered mode is
selected:
-
In Tethered Mode the records related to the contact and the
account are retrieved from Salesforce in real-time and therefore the list of
records that you are seeing the side panel is the actual list from Salesforce. When
you open a record for viewing/editing, if the record has been synced to
Outlook, then the record would open in Outlook, otherwise it will open in
Salesforce.
-
In Non-Tethered Mode, the records related to the contact
and the account are retrieved from Outlook and therefore may or may not
correspond in real-time with the list of records that you are seeing in
Salesforce (depending if they have already been synced). When you open a record
for viewing/editing, the record would open in Outlook. When you create a new
record, it will be created in Outlook and then synced to Salesforce.
After selecting the mode, click 'Next' to proceed with
configuring the sync settings for each object.
Contacts Sync - Tethered Mode
![]()
If you've selected tethered mode, you can enable the following:
-
Sync on Demand - Upon finding a contact in Salesforce (when
performing to real-time search), sync it to Outlook
-
Sync contacts from Outlook to Salesforce
Contacts Sync - Non-Tethered Mode
![]()
You can turn on/off contact sync as well as select the direction to sync
contacts: Salesforce to Outlook and Outlook to Salesforce.
The contacts that will be synced from Salesforce to Outlook include all the
contacts that are assigned to you or that are shared with you either through
your role hierarchy or through explicit sharing. The contacts that will be synced
from Outlook to Salesforce include all the contacts that you explicitly mark for
synchronization in Outlook.
Click the link to view how many contacts are marked to be
synced on your Salesforce user account.
Note: If you are upgrading from version 3.x, FrontEnd will
maintain backward compatibility and keep the same contact synchronization settings
you have been using. It will not apply the new settings.
Accounts Sync
![]()
Accounts Sync Configuration
-
You can turn on/off Accounts sync as well as select the direction
to sync Accounts: Salesforce to Outlook and Outlook to Salesforce
-
For the initial sync, you may limit the accounts to sync only
those accounts that have been created or modified within the selected timeframe.
The accounts that will be synced from Salesforce to Outlook include all the accounts
that are either assigned to you or that are shared with you either through your role
hierarchy or through explicit sharing.
Click the link to view how many
accounts meet the sync criteria that you specified.
Opportunities Sync
![]()
Opportunities Sync Configuration
-
You can turn on/off opportunities sync as well as select the
direction to sync opportunities: Salesforce to Outlook and Outlook to Salesforce
-
For the initial sync, only opportunities that were created,
modified or expected to close within the selected timeframe will be synced
The opportunities that will be synced from Salesforce to Outlook include all
the opportunities that are either assigned to you or that are shared with you
either through your role hierarchy or through explicit sharing.
Click the link to view how many
opportunities meet the sync criteria that you specified.
Cases Sync
![]()
Cases Sync Configuration
-
You can turn on/off cases sync as well as select the direction to
sync cases: Salesforce to Outlook and Outlook to Salesforce
-
For the initial sync, only open cases that were created, modified
or expected to close within the selected timeframe will be synced
The cases that will be synced from Salesforce to Outlook include all
the cases that are either assigned to you or that are shared with you
either through your role hierarchy or through explicit sharing.
Click the link to view how many
cases meet the sync criteria that you specified.
Leads Sync
![]()
Leads Sync Configuration
-
You can turn on/off leads sync as well as select the direction to
sync leads: Salesforce to Outlook and Outlook to Salesforce
-
You can choose to sync only Leads that have been created or
modified within the selected timeframe.
The leads that will be synced from Salesforce to Outlook include all
the leads that are either assigned to you or that are shared with you
either through your role hierarchy or through explicit sharing.
Click the link to view how many
opportunities meet the sync criteria that you specified.
Events Sync
![]()
Events Sync Configuration
-
You can turn on/off events sync as well as select the direction
to sync events: Salesforce to Outlook and Outlook to
Salesforce.
-
Any of your Salesforce events that are scheduled for today or in
the future will be synced.
Click the link to view how many events meet the sync criteria
that you specified.
Tasks Sync
![]()
-
You can turn on or off Tasks sync as well as select the direction
to sync Tasks: Salesforce to Outlook and Outlook to Salesforce.
-
Only Tasks assigned to you are synced
-
Only Tasks whose due dates are greater than the selected date are synced
The tasks that will be synced from Salesforce to Outlook include all the tasks
that are either assigned to you or that are shared with you either through your
role hierarchy or through explicit sharing.
Click the link to view how many
tasks meet the sync criteria that you specified.
Notes Sync
![]()
Notes Sync Configuration
-
You can turn on or off notes sync as well as select the direction
to sync notes: Salesforce to Outlook and Outlook to Salesforce.
-
Only Notes that have been created or modified within the selected timeframe are synced
The notes that will be synced from Salesforce to Outlook include all the notes that are
either assigned to you or that are shared with you either through your role hierarchy
or through explicit sharing.
Click the link to view how many
notes meet the sync criteria that you specified.
Other Salesforce Objects
The objects described in the sections above are selected by default for
synchronization. You may choose to also sync other standard objects such as
contracts, orders etc. which are by default turned off. You may also
choose to also sync custom objects.
Initial Sync Cycle
Once you've configured the filters for the various objects,
the system will prompt you to start synchronization. The Sync Now dialog allows
you to select the type of items that you wish to sync to Outlook.
![]()
Sync Now
Select the items you wish to sync and click 'Sync Now'.
Note: The initial sync cycle may take
some time depending on the amount of records you have in your Salesforce account.
During this time, the synchronization process will run in the background and
you will be able to continue working with Outlook. If you prefer not to run the
initial sync process at this time, click Close. You will be able to initiate
this process at any time by clicking the Sync Now button on the toolbar.
Upon Clicking 'Sync Now', the following dialog will come up
to inform you that process will now continue on the background via the Implicit
FrontEnd Taskbar application (as shown in the screenshot). The taskbar
application will display bubble notifications at the end of each phase in the
process and you can click on these bubbles to get additional status
information.
![]()
Initial Sync Notification
The Implicit FrontEnd taskbar icon will continue spinning
until the initial sync phase is completed. If you'd like to view detailed
information about which items are being sync, right-click on the taskbar app
and select 'Sync Status'
![]()
FrontEnd Taskbar App
![]()
Sync Status
Note: During the initial sync, all FrontEnd toolbar buttons
and menus are disabled until the process completes, at which point all
functionality is enabled.
FrontEnd Settings
You can view and edit the Implicit FrontEnd settings by
clicking the "Options" menu under the drop-down button on the toolbar:
General Settings
![]()
General Options
User Account
This section displays your account information: Salesforce
instance you are connected to and your user name and password. You can click
Verify to make sure you can log in to the server.
Web services protocol is set to SOAP for Salesforce
If there have been any changes to your LDAP or Single-Sign-On
settings, you can modify these settings directly from the general options tab.
Synchronize
This section allows you to configure several settings
related to synchronization:
-
Automatic background synchronization and how often
-
When creating new Outlook items such as contacts calendar and
tasks - should those be marked for synchronization by default? Or, if you
prefer, you may turn this setting off and manually select the items you wish to
mark for synchronization.
-
Upon creating a new contact / lead from an email via the side-panel -
should the email be automatically archived at that time?
-
When items are deleted from Salesforce - should the corresponding
items be deleted from Outlook?
Log File
For support purposes, you may be asked to enable logging,
select the maximum size of the log file and view the log.
Tethered Mode and Sync Configuration
See Sync Configuration
Email Archiving Settings
Email archiving options allow you to define the settings and rules for archiving
incoming and outgoing email:
![]()
Email Archiving Options
Email Archiving Rules Engine
You can use the Email archiving rules engine to create rules to archive
specific emails depending on different sets of parameters such as the email
addresses of senders/recipients, the account it was sent from / received,
words/phrases in the email subject and conversation topics. For more
information see Email Rules Engine
Manual-Archiving Settings
You can select one of the following options:
-
"Prompt me to select relationship before archiving" - If
selected, Implicit FrontEnd will prompt you upon clicking Archive Email to
select the records (accounts, opportunities etc.) to associate the archived
email with.
-
Do not prompt - The archive dialog will not be shown and the
default setting will be used to archive the emails to their respective contacts
and accounts
-
Automatically find and sync contacts/leads if not already synced
to Outlook - When checked, and prior to archiving emails, Implicit FrontEnd
will first search Outlook to find a matching contact/lead. If not found, it
will search Salesforce and if the contact/lead is found on the server, it will
sync it to Outlook and then archive the email.
-
Default follow up time
-
When archiving email messages, allow me to select from the following objects
- This option allows you (or your administrator) to limit the list of objects
to which emails can be archived. Click "Select Objects" to display a list of
all Salesforce objects that have relationships with either email or tasks.
From this list check those objects that you wish to allow email archiving.
Email Attachments
You can select one of the following options:
-
Archive attachments
-
Maximum attachments size
-
Limit the file type to the specified list of file extension
(comma delimited)
Side Panel Settings
![]()
Side Panel Configuration Options
This Side Panel configuration tab allows you to
select which objects (out of the ones that you enabled under the sync configuration
tab) will appear on the Side Panel and their order of appearance. Simply
enable the ones you would like to see and use the arrow buttons to re-order the
list. You may also configure the maximum number of records to show under each
object in the Side Panel.
In order to be displayed in the email side panel, objects must have relationship
with either the contact (sender or recipient of the email) or its respective account.
Therefore, this list may be a sub-set of all the objects you have enabled for
synchronization and includes only those object that have such relationship.
CRM Action Items Settings
FrontEnd creates three lists by default:
-
CRM Action Item - Default list for action items
-
Completed - List of all completed items (items
marked as done)
-
My Radar - A view of all action items that are
marked as 'My Radar' in all the other lists
![]()
In addition, you can create your own custom lists via the CRM Action Items
settings. Custom lists are very useful in many different scenarios: If you are
sales, marketing or support person, you can use custom lists to:
-
Categorize customer emails into different product categories
-
Categorize emails into leads vs. clients
-
Categorize emails into priorities based on the size and
timeframes of opportunities
-
Categorize emails into functional lists based on the required
response such as: requests for quotes, requests for demos or trials etc.
When you snooze an email, the list that you configure as default
will automatically be selected, but you can select the list that is most
appropriate for the particular email.
Additional configurable settings include:
-
Purge completed action items after N weeks - When an action item
is marked as complete it is moved to the completed list and will be
automatically purged after the specified number of weeks
-
Which email to show under My Radar - See My Radar
For more information see CRM Action Items
Advanced Settings
![]()
Advanced Configuration Options
The Advanced Configuration tab allows you to:
-
Change License Key - This is typically used to switch from a trial
license key to production
-
Reset Configuration - Use Reset Configuration only if you need to
switch from one server to another or if you need to switch user accounts. In
this case synchronization cannot be maintained across accounts and it is
therefore necessary to reset Implicit FrontEnd to its initial state and
re-synchronize the data from the new server/account.
Caution: Reset Configuration will
retain all the native Outlook data: contacts, calendar, tasks and emails but
will remove all the non-native Outlook items such as accounts, opportunities
etc.
-
Update Objects - if there have been any changes in the Salesforce
objects such as creation or modifications of new custom objects or fields, use
'Update Objects' to refresh the objects information in FrontEnd.
-
Manage User Licenses - This functionality is available to
Salesforce administrator only. See Managing User Licenses.
FrontEnd Ribbon
![]()
The ribbon consists of the following:
-
Implicit FrontEnd drop-down menu:
- Login - Launch a browser and go to Salesforce login page
- New: Contact. Lead, Meeting, Task, Account, Opportunity, Case, Note
- Help - Launch a browser and go to user guide starting page
- Options - Launch Options dialog
- Side Panel - Turn side panel on/off
- Email Rules Engine - Launch email rules engine
- Check for Updates - Check if new version of Implicit FrontEnd is available
- About
- Side Panel - Turn side panel on/off
- Search Contacts - Search for contacts on Salesforce
- CRM Action Items - Launch CRM Action Items lists' viewer
- Accounts - Display accounts list
- Opportunities - Display opportunities list
- Cases - Display cases list
- Leads - Display leads list
- Notes - Display notes list
- Sync Now - Manually trigger synchronization cycle
- Archive Email - Manually archive select email(s)
Email Side Panel
FrontEnd Email side panel is an extremely useful and
functional feature to view pertinent CRM information related to emails and take
immediate actions.
![]()
Side panel
The side panel is divided into sections:
-
Contact / Lead information
-
Account Information
-
Objects information (based on the objects selected under the side panel option)
Contact and Account information
The side panel shows the contact information for the contact/lead and the
account and supports the following actions:
- View/Edit - Clicking on the name opens the records for viewing/editing.
- Open Social Media - Open profile based on the information entered in Salesforce
- Archive As Email - Archive the email to the contact/lead and account records.
- Archive As Task - Archive the email as a task (open activity).
- Schedule a meeting - New meeting with contact (if meetings sync is enabled)
-
Activities and History - Open the activities screen for the contact or account:
![]()
-
Quick Note - Create a quick note and store in the contact's or
account's CRM records. The quick note window opens in place and slows you to
create a note and save it directly to Salesforce. Once the note is saved, the
icon changes to green to indicate that you have created a note for this email
message and the particular CRM record. This indicator is 'persistent', which
means that it stays as part of the email message and you can re-visit it any
time, view and make changes.
![]()
- Open in Salesforce - Launch a browser and open the record in Salesforce
Note: To enable the social media action icons for contacts, create custom fields under
the 'Contact' object in Salesforce. You can create a separate custom field for each social
network that you would like to use. Make sure that the field name contains within it, the
exact name of the social network (e.g.: 'LinkedIn', 'Facebook', 'Twitter', 'Google').
You may create them as URLs or as text fields containing only the 'Contact ID' of the person
on that network.In Outlook, simply select these fields as custom fields for contacts.
FrontEnd will automatically detect these custom fields and link them to the action icons on
the side panel.
Multiple Email Recipients
If there are multiple recipients in the email message, you'll notice that there
is a small drop down arrow which shows you the email addresses of all
recipients and allows you to switch the side panel to display the information
for the select recipient:
![]()
Related CRM Records
Below the contact and account information, the side panel display the objects
that you have selected to show under Side Panel Options
including the number of records under each object type.
The behavior of the side panel depends on whether Tethered mode or
Non-Tethered mode is selected and whether or not the specific object
is being synchronized to Outlook.
Note: the side-panel shows only objects that are releted to either the contact
(sender or one of the recipients of the email) or its account.
Tethered Mode View
In Tethered Mode the records related to the contact and the account are
retrieved from Salesforce in real-time and therefore the list of records that you
are seeing the side panel is the actual list from Salesforce. When you open a record
for viewing/editing, if the record has been synced to Outlook, then the record
would open in Outlook, otherwise it will open in Salesforce.
When you create a new record, if the object is selected for
sync, the record will be created in Outlook and then synced to Salesforce,
otherwise FrontEnd will direct you to the appropriate Salesforce page to create a
record directly in Salesforce.
Non-Tethered Mode View
In Non-Tethered Mode, the records related to the contact and the account
are retrieved from Outlook and therefore may or may not correspond in real-time
with the list of records that you are seeing in Salesforce (depending if they
have already been synced). When you open a record for viewing/editing, the
record would open in Outlook. When you create a new record, it will be created
in Outlook and then synced to Salesforce.
User Actions
Similar to user actions for contact/account, FrontEnd allows you to:
-
View/Edit - Clicking on the name of the record
opens the records for viewing/editing. If the record has been synced to
Outlook, it will open in Outlook, otherwise (in Tethered mode) it will open in
Salesforce.
-
Archive Email - Archive the email to the related CRM record (e.g. opportunity or case)
-
Archive Email as Task - Archive the email as a task and create new activity
-
Activities and History - Open the activities screen for the CRM record
-
Quick Note - Create a quick note and store in the CRM record.
-
Open in Salesforce - Launch a browser and open the record in Salesforce
-
Add a Record - Add an opportunity, case, meeting
task or any other object type that you selected for the side panel.
Note: There is one exception in the side panel logic - When
you add a new opportunity or a case directly from the side-panel (and both are
synced to Outlook), the appropriate form opens up and allows you to enter the
information. Upon saving, FrontEnd will also create the record on Salesforce in
real-time rather than wait until the next sync cycle. The reason for that is the
need to archive the email to the new record at the same time of creating it.
Unknown Contact / Lead
If the email is received from an unknown contact or a lead it will display an
'Unknow contact' message
![]()
Tethered mode
In Tethered Mode - Since FrontEnd always performs real-time search for
the contact on Salesforce, unknown means 'not found' on Salesforce and therefore
'Search in Salesforce link' is not visible. You can then create a new contact or
lead record directly in Salesforce.
Non-Tethered mode
In Non-Tethered mode - Unknown means it wasn't found in Outlook and it
can potentially exist in Salesforce, therefore the system allows you to search
for it and if found it will be automatically synced to Outlook at that time and
the relevant information will then be displayed in the side panel.
You can then create a new contact or lead record in Outlook
and sync it to Salesforce. When creating a new contact, FrontEnd will prompt you
to select the account for which the contact should be created:
![]()
Account Selection
If the account exists in
Outlook, simply start typing the name and it will display the matching account.
If the account does not exist in Outlook, the system will search Salesforce for
the account name you entered and if found (if for example the account is
assigned to another user) it will sync it to Outlook. Otherwise, it will prompt
you to confirm creation of a new account and display an Outlook contact form
with the account already selected.
Create Lead
Implicit FrontEnd will extract the name an email address
from the email, and display a lead form with these fields pre-populated so that
you can enter the rest of the lead information. The lead will then be created
on Salesforce and synced to Outlook.
With all three options, upon completing the creation and
sync of the account, contact or lead, the selected email will be automatically
archived to that record.
Shortcuts Menu
The shortcuts menu allows you immediate access to various FrontEnd
functionality:
![]()
-
CRM Action Items - Open Action Items
browse window
-
Create Action Item Rule - Create a CRM Action Item rule based on the
currently selected message: by contact, account
-
Archive Email - Archive the currently selected email
-
Archive Conversation - Archive the complete email conversation
of the currently selected email
-
Create Archive Rule - Create an email archive rule based on the currently
selected message: by contact, account or conversation
-
Email Rules Engine - Launch the email rules engine
-
Options - Open FrontEnd options
Snooze
Snooze email to create an Action Item. See CRM Action Items
Working with CRM Objects
CRM Object Browse Window
Clicking on any of the CRM objects buttons on the ribbon launches the CRM
object Browse Window.
![]()
This allows you to view the various lists of Salesforce
objects: accounts, opportunities, cases, leads, notes and any additional object
you have selected to sync to Outlook, including custom objects.
The list displays all records that have been synced to
Outlook. From the browse window, you can:
-
View record information and its relationships in the side panel
-
Click on any record and open it for viewing/editing
-
Crate new records
-
Delete records from Outlook (records will not be deleted from Salesforce).
-
Search for records that have been synced to Outlook
-
Search for records on Salesforce that have not been synced to
Outlook and select to sync them to Outlook
Search
You can search for accounts in Outlook or un-synced accounts on Salesforce
by any of the account fields:
![]()
When you search for records (leads in this example) in
Salesforce you'll notice that the items that have been already synced to Outlook
are grayed out and their icon is a regular lead icon while the items that have
not yet been synced, have normal font with a globe icon.
To sync records from Salesforce to Outlook, simply select the records
and click "Sync to Outlook".
Accounts
Opening an account record that has been synced to Outlook opens the account's
form for viewing/editing:
![]()
Account Form
The account form has multiple tabs:
-
Overview
-
More information - additional data fields
-
Custom Fields - This tab should up only if you enable custom
fields for Accounts in FrontEnd.
-
Related Data - A multi-tab control that shows all the related
records to this account.
![]()
Related data includes list of any
Salesforce items that were synced with Outlook (or created in Outlook and synced
to Salesforce):
-
Opportunities
-
Cases
-
Activities (meetings and tasks)
-
History & Notes. History includes held meetings and completed
tasks.
-
Contacts
-
Received / Sent Email (any emails associated with the account
that were archived to Salesforce)
-
Documents (any documents associated with the account that were
archived to Salesforce)
Clicking on any item in any of the lists will open the item
in Outlook. Documents will be opened in their native application (Word, Excel,
Acrobat, etc.)
Users may also add items directly into the account by
clicking New. Note that the new item will automatically be related to the
selected account.
Opportunities
Opening an opportunity record that has been synced to Outlook opens the
opportunity's form for viewing/editing:
![]()
Cases
Opening a case record that has been synced to Outlook opens the case's form for
viewing/editing:
![]()
Leads
Opening a lead record that has been synced to Outlook opens the lead's form for
viewing/editing:
![]()
Notes
Opening a note record that has been synced to Outlook opens the note's form for
viewing/editing:
![]()
Other CRM objects' forms include: Projects, contracts, bugs, processes etc.
Contacts
Outlook Contact Form
Implicit FrontEnd integration with Outlook allows you to take full advantage of
the rich functionality that Outlook provides for managing contacts. As you can
see in the screenshot below, an Implicit FrontEnd pane (called "Form Region")
extends the standard contact form to offer Salesforce-specific functionality.
![]()
Contact Form
Selecting to sync an Outlook contact with Salesforce marks the
item as a green Outlook category to provide you with a noticeable visual
indicator that this contact is synced (as oppose to personal contacts that
should not be synced with Salesforce). Any Salesforce contacts that are synced to
Outlook will automatically be marked as green.
Through the extended contact form you can select to archive
any email received from or sent to this contact and automatically associate it
with the contact and its account.
Clicking the "Activities and History" link will launch the
contact's list of all related records.
Contact List
![]()
Similar to emails, the Side panel extends the Outlook's contact list view and
provides detailed information on the selected contact. Through the side panel
you can view/edit any Salesforce items related to the contact or the account
as well as create new items.
Salesforce Contact Search
To search for contacts on the Salesforce server (which may or may not have been
synced to Outlook), select the contact folder and click the Contacts Search button
on the Implicit FrontEnd ribbon (toolbar):
![]()
![]()
Note: Contacts which have not been synced to Outlook will show up with
an icon of a green globe on top of the standard contact icon. To sync them to
Outlook, select the set of contacts that you wish to sync and click "Sync to
Outlook". Notice that after the synchronization, their icon changes to the
standard contact icon.
Events
Calendars are also native to Outlook and the Implicit
FrontEnd integration with Outlook allows you to take full advantage of the rich
functionality that Outlook provides for managing calendar events and
synchronizing your meetings with Salesforce calendars.
Similar to the contact form, Implicit FrontEnd form region
extends the standard calendar form to offer Salesforce-specific functionality.
![]()
Selecting to sync an Outlook meeting with Salesforce marks the item as a green
Outlook category to provide you with a noticeable visual indicator that this
meeting is synced (as oppose to personal appointments / meetings that should
not be synced with Salesforce). Any Salesforce meetings that are synced to Outlook
will automatically be marked as green.
Note: Outlook makes a distinction between
appointments which are calendar events without attendees and meetings where an
email invite is sent to other meeting attendees. Implicit FrontEnd allows you
to sync both appointments and meetings with Salesforce.
When sending a meeting invite to Salesforce contacts, the
meetings will be synced to your Salesforce calendar as well as archived to the
contact's record on both Salesforce and Outlook. Similarly, when accepting a
meeting invitation from a Salesforce contact or a lead, the meeting will automatically
be synced and archived accordingly.
Note: At the bottom of the calendar form you can
optionally specify if the meeting is related to other Salesforce items such as
account, opportunity, case, contact etc. In this case, in addition to syncing
the meeting with the contacts record, it will also be associated with the item
you specified.
Related Data
![]()
Side panel - Calendar
You can view/edit and create new meetings directly from each
of the views and automatically associate them with the related item.
Note: Active meetings show up under Activities. Past
meetings which were held, show up under the History tab.
Tasks
Implicit FrontEnd form region extends the standard task form
to offer Salesforce-specific functionality.
![]()
Task Form
Selecting to sync an Outlook task with Salesforce marks the
item as a green Outlook category to provide you with a noticeable visual
indicator that this task is synced. Any Salesforce tasks that are synced to
Outlook will automatically be marked as green.
At the bottom of the task form you can specify what the task
is related to and separately the contact involved.
Email Archiving
FrontEnd provides multiple methods
of archiving emails to CRM records:
-
Drag & Drop
-
Archive as Email or as Task via side-panel
-
Manual (advanced) email archiving dialog
-
Email archiving rules engine
Notes:
-
You can only archive emails to CRM objects that have relationship with the email
object on Salesforce.
-
In Auto-Archiving mode, in addition to the specific record, the email will also
be archived to all recipients' records and their respective accounts.
Drag & Drop
The easiest way to archive an email to a CRM record is to drag the email from
its folder in Outlook and drop it on a CRM record in the side panel. You can
drop it on a contact, lead, account, opportunity, case etc. If you drop it on a
contact record, it will be automatically archived to the contact and its
account and vice versa.
When an email is dropped on a CRM object, the email and
attachments (if enabled) are uploaded to Salesforce and are associated with the
selected record.
Archive As Email or As Task Via Side-Panel
You can also archive an email simply by clicking the archive button on the
side-panel, next to the record that you'd like to relate the email to.
FrontEnd provides two types of archiving:
Archive Email - when you want to archive the email as a past activity in
order to keep a track record of email communication related to the CRM
record. If the email contains attachments, a drop-down button shows up as
shown below, to allow you to select which attachments should be archived.
![]()
Archive Email as Task - when you want to create a new activity under the
selected record to remind you to take some action related to the archived
email. Upon clicking the "Archive as Task" button, you'll be prompted to
select the due date for the task and if there are any attachments, a
drop-down button shows up as shown below, to allow you to select which
attachments should be archived.
![]()
Manual (Advanced) Email Archiving Dialog
To manually archive one or more email messages from an Outlook folder (e.g.
Inbox), select the email(s) and click the Archive Email button on the toolbar
or right-click and select Archive Email from the context menu. Depending on the
settings of the email archiving that you configured under
Email Archiving Options, the system will execute
the following logic:
-
If you selected to automatically find and sync contacts/leads if not already
synced to Outlook -the system will scan all selected emails and extract all
email addresses of their senders. Next it will search Outlook to find matching
contacts/leads. If not found, it will search Salesforce and if finds matching
contacts / leads on the server, it will sync them to Outlook.
-
If you selected to not to be prompted when archiving email, the system will
automatically archive each email with its respective contact and account.
-
If you selected to be prompted when archiving an email, the system will bring up
the Manual Email Archive dialog shown below:
![]()
Email Archive
The archive dialog provides you with three options to
associate the archived email:
-
Archive each message with its respective Salesforce contact / lead
and account records - this is default option and a common practice for most Salesforce
users. In the case of multiple emails this is the only option available.
-
The system displays a list of all related records such as account, opportunities,
cases etc. This allows you to select one record to archive the email in addition
to the contact record.
-
If you want to associate the email with a different record which may or may
not be part of that account, or with a custom object, select the third option
and choose the type and actual record which the email should be related to.
The "Related To" list will include the list of standard and custom objects that
your admin has configured as the list of objects to which email can be archived
(under Options > Email Archiving).
-
Email Format - You may select to archive the email as an email message in
Salesforce (Past Activity) or as a task (New Activity), in which case you
may also set a due date for completion.
If the email contains one or more attachments, the attachment button would
become visible to the right of the subject line and allow you to select which
attachments to archive. By default, FrontEnd will apply the selection of file
types under Options > Email Archive, but will allow you to override the default
selection, and select any file.
You can also choose to create a follow up meeting or
task on the specified date in order to follow up on the customer
correspondence. This will automatically create an Outlook meeting or task and
sync it with Salesforce. You can also choose to automatically create a new
opportunity or case record upon archiving the email.
When you select a single email to archive, the subject field
displays the subject of the email and allows you to modify the subject of the
archived email.
Manual archiving of outgoing Email
To archive an outgoing email, simply compose the email and
instead of clicking Send, click "Archive and Send" as show below. The system
will prompt you to archive the email by displaying the same archive dialog as
for incoming messages.
![]()
Auto email archiving
See Email Rules Engine
Archiving an Email Conversation Thread
To archive all inbound and outbound emails that are part of one conversation thread,
select an email message and click "Archive Conversation" (right-click menu, ribbon
button or blue-menu shortcut).
Outlook has the ability to group emails together into what Microsoft defines as
a conversation which constitutes a number of parameters: subject, group of
email recipients, devices, etc.
Implicit FrontEnd leverages this native Outlook functionality to allow you to archive
all emails that are part of the same conversation to Salesforce and associate it with
specific CRM records. You may choose to archive each email to its respective
contacts/accounts or a specific CRM record. Since a conversation typically revolves
around a specific topic, you have the ability to be more granular than just archiving
to contact/accounts records and select the specific record CRM record such as a specific
opportunity or a case.
![]()
Upon selecting "Archive Conversation", you will be prompted with the above dialog
allowing you to select the following:
Upon clicking 'Archive', FrontEnd will start archiving all the emails you have selected.
The archive process runs in the background so you can continue working with Outlook in
parallel. If at any time, you'd like to see the status, you can do so by right-clicking
on the FrontEnd taskbar app and selecting 'Upload queue'.
Note: The "Related To" list will include the list of standard and custom objects that
your admin has configured as the list of objects to which email can be archived (under
Options > Email Archiving)
Email Rules Engine
The Email Rules engine allows you to create different rules for processing incoming
or outgoing emails and perform an action. There are currently two types of actions:
-
Archive Email to CRM
-
Create an action item based on Email
Email Archiving Rules
FrontEnd version 4 introduced a new method of archiving emails. Similar to
Outlook's native rules engine, you can define different rules for email
archiving:
![]()
You can create new rules, modify, enable/disable or
delete them.
Under Rule Description you can see a summary of the rule: From/To, subject
contains, and the CRM to which FrontEnd should archive the email.
A rule consists of the following:
![]()
-
Rule Name - Assign any name which is meaningful to you
-
The currently supported actions are 'Archive Email', 'Create CRM Action Items' and 'Create Cases
-
Apply To - Choose to apply to received emails, sent emails or both.
-
From - The email address from which the email was received from or sent from. The following options are available:
-
Any Contact - Select 'Any Contact' if you would like to create a rule that applies to emails from/to any CRM contact
-
Any Lead - Select 'Any Lead' if you would like to create a rule that applies to emails from/to any CRM lead
-
Select Account - Select a specific account. The domain name of the account will be used and apply to any individual with an email address with the selected domain name
-
Select Contact - Select a specific contact email address
-
Select Lead - Select a specific lead email address
-
Specify Email Address(es)
-
To/CC - The email address to which the email was sent to. Same options as described above
-
Subject Contains - Rules based on words or phrases in the email subject. The following options are available:
-
Opportunity Name - Select an opportunity and create a rule that archives all emails containing the opportunity name in the subject line
-
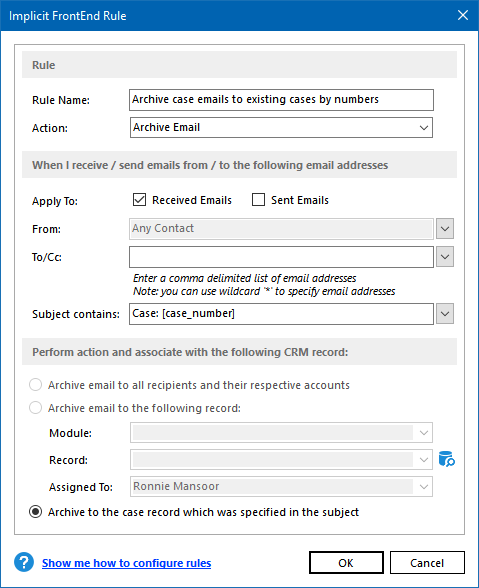
Case Number - Select a case and create a rule that archives all emails containing a string such as 'Case: 1234' in the subject line,
where 1234 is the case number of the case record you select. You can then edit the text to match it to your own format.
-
Any Case - Select this option to automatically archive all emails to their corresponding case records if you are using a
standard form of subject line in all your communication related to support cases. For Example, if all emails contain in
their subject line a string such as 'Case: NNNN' where NNNN is a case number. In this case FrontEnd will check at run time
if the email subject contains such a string and if NNNN is a valid case number and will archive the email to the case.
You can edit the text to match it to your own format.
-
Select CRM Record - You have two options:
-
Archive the email to all recipients and their respective accounts
- In this case the records will be determined at run-time based on the email
addresses of the recipients (if they are found as CRM contacts/leads and their
parent accounts.
-
Archive to a specific record that is determined at the time of
creating/editing the rule.
Create Rule Based on Currently Selected Email
FrontEnd allows you to create rule directly from the side-panel for the
contact, lead or account that is being displayed based on the currently
selected email. The following example shows an email that was received from
Jane Connely at JBC Bank. FrontEnd identifies the contact and the account and
automatically allows you to define a rule for them.
![]()
Create Rule Based on an Email Conversation
The biggest drawback of auto-archiving is that it is too broad. You can set
rules to archive all email correspondence with a particular contact or all
emails to/from all individuals within an account.
FrontEnd 4 introduces a new method of archiving emails based
on a specific conversation. Just as Outlook allows you to view emails by
threads of conversations, you can now set rules based on these conversations. A
conversation is identified by a Topic and a set of email senders and
recipients and Outlook has the ability to associate all emails that are related
to the same topic and are sent, replied to or forwarded by any of these senders/recipients
into one conversation thread. Very often the topic is specific to an
opportunity or a case or other CRM objects, therefore allowing you to be much
more granular in archiving emails to specific CRM records.
The following examples shows a rule based on a conversation
topic: "Quote for 192 new units" which is archived to the corresponding
opportunity:
![]()
Create Rule to Archive Emails to Cases
You can use the rules engine to create rules to archive emails to case records.
These rules are very useful when you use a support ticket system to manage all support emails.
In this case the support ticket system has its own format of email subjects e.g.:
email start or contain a sub-string 'Case: 9011257' where 9011257 is the ticket or case number.
You can change this sub-string to match your own format. In this scenario, you have the following options:
-
Create a rule for a specific case by selecting the case and specifying the expected format of the subject.
-
Create one rule for all case records by specifying the format e.g. 'Case: [Case Number]' -
This means any email with sub-string in the subject line that starts with 'Case :' followed by a
numerical value that must match a valid case number in the CRM
Action Items Rules
FrontEnd allows you to create and manage rules for automatically converting
inbound and outbound emails into action items:
![]()
You can create new rules, modify, enable/disable or
delete them.
An action item rule consists of the following:
![]()
-
Rule Name - Assign any name which is meaningful to you
-
Action - Create CRM Action Item
-
Apply To - Choose to apply to received emails, sent emails or both.
-
From - The email address from which the email was received or sent.
Typically, this indicates the email address of the person who sent you an
email, but it can only be used for outgoing emails when you have multiple
accounts in Outlook and you choose to only archive emails sent from a specific
account.
-
To/CC - The email address to which the email was sent. Typically,
this indicates the email address of the person you are sending the email, but
it can only be used for received emails when you have multiple accounts in
Outlook and you choose to only archive emails that were received into a
specific account.
-
Subject Contains - Rules based on words or phrases in the email subject
-
CRM Action Item List - Select the list where the action item should be created
-
Object / Record - select the CRM object and record to associate with this action item
Create Action Item Rule Based on Currently Selected Email
FrontEnd allows you to create a rule directly from the side-panel for the contact,
lead or account that is being displayed based on the currently selected email.
The following example shows an email that was received from Jane Connely at JBC Bank.
FrontEnd identifies the contact and the account and automatically allows you to define a rule for them.
![]()
Create Cases Rules
You can create rules to automatically create new CRM 'Case' records. It is very useful when
support emails are either send from a specific email address (e.g. your web site support forms
are sent from web@mydomain.com) or that are sent to a specific email address such as support@mydomain.com.
In these scenarios, you can create a rule to intercept such emails and automatically create 'Case'
records based on the information in the emails. FrontEnd will examine all inbound and outbound
emails to find a match and if found will create a new 'case' record and archive the email to the record.

CRM Action Items
Overview
CRM Action items are designed to help you manage your daily
activities as they relate to processing, prioritizing and responding to inbound
email. Most sales, marketing and support people receive a large amount of
emails from clients and leads on a daily basis. Processing and responding to
these emails consume a significant amount of time every day. FrontEnd new
CRM
action items
is a tool that makes you more productive
by helping you manage your email correspondence with your customers in the
context of your daily CRM work and your CRM data. It helps you manage the
process of sorting, prioritizing and keeping track of the emails that you need
to respond to. It also ensures that the most important emails that require your
attention and follow up are always on top of your priority list.
Creating Action Items
You can create action items in one of two ways:
-
Snooze an Email
-
Create a new task as an action item
Snoozing Emails
When you review received emails, if you do not wish to
respond to them immediately, click the snooze button on the email side-panel
![]()
The selected email will be added to your Action Items'
list and the view will switch to a Snooze view:
![]()
In Snooze view, you have access to the following
functionality:
-
Details - Click Details to switch back to Details
view (toggle between the two views)
-
Mark as Done - When you are done with the
email, click the button to remove the email from your CRM Action Items'
list and into the 'Completed' list. You can mark emails as 'Done'
or dismiss them either from the email side panel or from the
CRM Action
Items
window.
-
Dismiss - Click Dismiss to remove the email
from your CRM Action Items' list.
-
Snooze until - today, tomorrow, this week, next
week, later. Clicking on any of these links will set the snooze timeframe
accordingly.
-
Reminder - You can select to set a reminder to
yourself when your response to the email is due.
-
Add to List - Select the list that you would like
to add this email to
-
Add to My Radar - Adding an email to 'My Radar'
will ensure that you will always be on top of high-priority issues such as
opportunities or important cases. You can view and manage 'My Radar' action
items in any of your action items list but also as a separate list.
-
Related To - Select the CRM record that you would
like to associate with this action item. By default, the 'Related To' is
set to the account, but you can also select the contact or any specific record
related to the account & contact such as opportunity, case, meeting, etc.
If the email has already been archived to a specific CRM record, that record
will automatically be selected as the 'Related To' record.
To snooze an email:
-
Click the Snooze button on the side panel
-
Select the snooze timeframe
-
Set a reminder if required
-
Select a list if different than the default list
-
Select the CRM record that it is related to if different than the default record
Related To
The logic for selecting the 'Related To' record is
as follows:
-
By default, the email by associated with the account or the contact
(if no account is defined)
-
If the email has already been archived (either manually or
automatically) to a particular record such as opportunity or a case - the
record will be selected
-
You can change the 'Related To' to any record related to
the contact or account
Action Items Settings
FrontEnd creates three lists by default:
-
CRM Action Item - Default list for action items
-
Completed - List of all completed items (items
marked as done)
-
My Radar - A view of all action items that are
marked as 'My Radar' in all the other lists
![]()
In addition, you can create your own custom lists via the CRM Action Items
settings. Custom lists are very useful in many different scenarios: If you are
sales, marketing or support person,
you can use custom lists to:
-
Categorize customer emails into different product categories
-
Categorize emails into leads vs. clients
-
Categorize emails into priorities based on the size and
timeframes of opportunities
-
Categorize emails into functional lists based on the required
response such as: requests for quotes, requests for demos or trials etc.
When you snooze an email, the list that you configure as default
will automatically be selected, but you can select the list that is most
appropriate for the particular email.
Additional configurable settings include:
-
Purge completed action items after N weeks - When an action item
is marked as complete it is moved to the completed list and will be
automatically purged after the specified number of weeks
-
Which email to show under My Radar - See My Radar
Managing Action Items
When you snooze an email, it will show up in the CRM Action Items browse
window under the list the you selected. To browse the different list, simply
select the list via the drop down on the right-hand side of the ribbon.
![]()
The Action Items browse window offers two viewing modes:
-
Action Items grouped by dates: today, tomorrow, this week etc.
and sorted by priority
-
Action Items as a simple list with no grouping sorted by any of
the columns
Re-prioritizing Action Items
You can re-prioritize action items only when you are in 'Group by Date' viewing
mode:
-
Drag and drop the item within each date group or between date groups
-
Select an item and use the move up and down buttons
Mark as Done and Dismiss
When you're done with an action item, click 'Mark as Done.
If the item is not a 'My Radar' Item - It will be moved from
the current list to the 'Completed' items list for a period that you
specified under Action Items settings after which it will be purged.
'Dismiss' will simply remove the action item.
My Radar
Items marked as 'My Radar' are handled differently than regular action
items. They are highlighted in the different lists but are also visible in the
'My Radar'list which shows all items marked as 'My Radar'.
If you selected to always show the latest email in each
conversation, FrontEnd will monitor the incoming and outgoing email flow to
identify emails that are part of the 'My Radar' conversation thread and
will keep refreshing the action items so that you'll always have visibility to
the latest correspondence.
When you are done responding to a 'My Radar' it will
be moved to the 'Completed' list, however, it will continue to be listed under
the 'My Radar' list and will continue to be refreshed until you dismiss
it from the 'My Radar' list. This allows you to keep track of important
matters even after you responded to the latest email in the corresponding
conversation. For example: if you may receive an RFQ from a customer and sent the
quote, you might want to keep the item on your radar list and set a reminder so
that you can follow up if the customer does not respond within a certain amount
of time.
Custom Objects and Fields
Adding Custom fields to a standard Salesforce Object
To add custom fields to a standard Salesforce object, go to Options > sync
Configuration, select the object and click "Custom Fields".
Implicit FrontEnd will display a list of drop-down lists
arranged in two columns. Each of the controls will contain a list of custom
fields that are defined on the Salesforce server for the object you have chosen.
Select the fields you would like to display in Outlook. Once a field is
selected it will be removed from the list of available custom fields. This
allows you to select the fields you would like to sync to Outlook as well as
define the layout of the form in Outlook.
The following example illustrates custom fields being added
to the Accounts object:
![]()
Contact - Custom Fields
You may also select a blank entry to create a separator in
the form.
Once the fields have been selected, click Save to go back to
the Sync Configuration dialog, click "Sync All". "Sync Now" dialog will show
up. You can now click the Sync Now link that corresponds to the object you have
modified. This will synchronize all the custom fields you selected from
Salesforce to Outlook.
Once you have synchronized the custom fields, open a contact
from in Outlook and click "Custom Fields".
![]()
Contact - Custom Fields Form in Outlook
As you can see the form layout corresponds to the layout you
selected. Each field will be displayed depending on its type: text entry, list
control, date, checkbox, etc.
Adding a Custom Object
To add a Salesforce custom object, go to Options > sync Configuration, and
select the object for the list of available objects.
![]()
Adding Custom Object
Click the checkboxes below it to enable this object and
select the direction of sync.
Click "Custom Fields" and follow the directions in section
11.1 on how to add custom fields to your object. This step is exactly the same
whether you're creating a custom object or adding custom fields to a standard
object.
![]()
Adding Custom Object
Once you've selected the custom fields, click the "Columns"
tab and define the columns. Those are the columns that will be used when
displaying lists of the custom object you have chosen:
![]()
Custom Object - Columns
Once the fields /columns have been selected, click Save to
go back to the Sync Configuration dialog, click "Sync All". "Sync Now" dialog
will show up. At the bottom you'll see a new type of items called "Other". This
represents all the additional objects not explicitly listed. Click the Sync Now
link next to "Others". This will synchronize all the custom object items from
Salesforce to Outlook.
Once you've added one or more custom objects they would show
up in the menu under "More":
![]()
View Custom Objects
Document Archive
Archiving Microsoft Office Documents
Implicit FrontEnd provide tight integration not just with Microsoft Outlook but
with Microsoft Word and Excel. As part of Implicit FrontEnd installation on
your PC, a Side panel will be added to Microsoft Word and Excel.
![]()
Word / Excel Side panel
This Side panel allows you to archive Office documents to
Salesforce directly from within Office apps. To archive a document follow these
steps:
-
Save the document
-
Click the Side panel button on the Implicit FrontEnd ribbon
-
Check the "Archive this document on Salesforce" checkbox
-
In the "Related to" drop-down, select the Salesforce records type the document is
related to: account, opportunity, case, contact, lead etc.
-
In the "Related to Item" start typing the name of the item. The system will
auto-complete your entry based on the items that you have synced to Outlook.
-
You may continue editing the document and simply save it as you normally do on your
PC and close it.
There is no need for any explicit
upload. The document will be automatically archived to the Salesforce record that
you have specified upon the next synchronization cycle.
Archiving Non-Office Documents
To archive non-office documents such as Adobe PDF, browse to the folder, select
the document, right-click and select Send To -> Implicit FrontEnd.
The following dialog will prompt you to select the Salesforce
record to archive the document to:
![]()
Archiving non-Office Documents
Web Browsers Integration
Implicit FrontEnd allow users not only to access most of Salesforce functionality
from within Outlook but also access Outlook from their Web browser as they are
working with Salesforce.
Currently support browsers include: Microsoft Internet Explorer (IE) and Google Chrome.
The functionality and user interface of the Implicit FrontEnd plug-in is identical
across the two browser but the initial behavior of each browsers after installation
is slightly different. In the next two sections, we will describe the specific
behavior of each browser and the common functionality.
Internet Explorer
Upon launching IE for the first time after installation, IE will display the following
message at the bottom of its window and prompting you to enable the plug-in:
![]()
IE message to enable Plug-in
Once enabled, you will notice that a new Implicit FrontEnd toolbar is added. Upon
attempting to access Outlook from within the browser for the first time, you will
be prompted to allow such access. To avoid being prompted again select "Do not
show me the warning for this program again."
![]()
IE message to enable access
Google Chrome
Upon launching Chrome for the first time after installation, Chrome will display
the following message at the bottom of its window and prompting you to enable the plug-in:
![]()
Chrome message to enable Plug-in
Using the Browser Integration
The Plug-in menus are context sensitive. They dynamically adjust to the URL displayed
in the browser. When you are logged out of Salesforce, all functions will be unavailable
except for login and About.
![]()
Once you are logged in to Salesforce, the menu will continue to adjust itself based on
the item that is currently selected in the browser. The following example shows the
available functionality when you select an email that was archived to Salesforce.
The following is a list of all available functions:
-
Login - Will redirect you to the login of the same Salesforce instance you have configured for Outlook
-
Open in Outlook - Open the Salesforce item in Outlook. If the item has already been synced, the
function will open the Outlook item corresponding to the record being viewed in Salesforce. If the
item has not been synced yet, it will be synced first and then opened in Outlook. This function
is available to all objects.
-
Email - This function is available to the following objects:
- Contacts / Lead - Compose a new email to selected contact/lead
- Document - Compose a new email with the selected document attached
-
Schedule a Meeting - This function is available when a contact/lead record is
selected and allows you to schedule a meeting with a Salesforce contact/lead
via Outlook. A meeting invite will be opened in Outlook, pre-populated with
the contact's info. You can then leverage all the rich calendaring functionality
that Outlook/Exchange offers, such as, scheduling conference rooms or other
shared resources, view available timeslots of colleagues if you would like
to invite them to the meeting etc. The meeting invite will be sent via
Outlook which will then allow you to receive back into your Outlook
calendar accept/dent responses from meetings attendees etc.
-
Reply / Reply All / Forward - This function is available to emails which have been archived in Salesforce:
-
Email - Reply / Reply All / Forward the selected archived email. If the
email has been archived by the same user and the same Outlook profile
or Exchange account, the original email will be open in Outlook based
on the requested action: reply to sender, reply all to all recipients
and forward to a blank recipient list.
-
Related Emails - This function is available to the following objects:
- Account - Show all Outlook emails related to the selected account
- Opportunity - Show all Outlook emails related to the selected opportunity
- Case- Show all Outlook emails related to the selected case
- Contact / Lead- Show all Outlook emails related to the selected contact / lead
-
Sync Now - This function is available to all objects and triggers the same "Sync Now" function as in Outlook.
-
About - About Implicit FrontEnd.
Implicit FrontEnd Taskbar Application
Upon installing Implicit FrontEnd on your desktop, you'll
notice that an icon is added to your Windows taskbar
![]()
Taskbar Application
The taskbar application is responsible for the following:
-
Run the initial synchronization in the background, including providing notification
and status messages during the synchronization.
-
Queuing up emails and documents in order to upload them to Salesforce.
-
Checking for new software updates
Queuing up emails and documents for uploading to Salesforce is
necessary in order to support offline mode (see Offline Mode). At any time, you
can view the upload queue to see the messages and files being uploaded, suspend
and resume the upload process as well as re-order the queue if necessary.
![]()
Upload Queue
Offline Mode
Most of Implicit FrontEnd functionality is available in
offline mode. You have full access to all items that have been synchronized to
Outlook. You can create new items or modify existing items. You can also
archive email messages and documents. All your changes will be queued by Implicit
FrontEnd and automatically synced with Salesforce when you re-connect to the
Internet.
The only exceptions which do not work in offline mode are
those functions that require real-time access to the server:
-
Find and sync contact / lead
-
Create records from side panel
-
Automatically sync contacts / leads upon archiving emails
-
Search for non-synced items on Salesforce
Administration
Centralized Configuration
FrontEnd 4 enables CRM administrators to centrally manage the FrontEnd
configuration on users' desktops. Administrators can create a configuration and
publish it to one or more Salesforce role.
A FrontEnd configuration is a collection of all settings under
options including:
-
Sync Configuration - Which objects are to be synced, in which
direction, what filters to apply and which records to sync etc.
-
Tethered Mode - how to sync contacts
-
Email archiving policies
-
Side panel - Which objects to show on the side panel and how many
records of each.
When users with CRM administration privileges are logged in
to FrontEnd, the software will show an additional tab under options called 'Adminstration'
which is otherwise hidden for regular users.
![]()
Once you have configured all the settings, you can publish
them as one configuration to specific roles by selecting one or more roles
(using the Ctrl button):
You can repeat this process as many times as you want. If
you need different configurations for different roles, simply create the
configuration, publish to the role(s), then modify the configuration and
publish to a different set of roles.
You can choose to allow users to modify their own settings
by checking the box. Otherwise, the settings will be read-only. Users may view
them but will not be able to modify them. The only exceptions are:
-
Number of items to show under the side panel
-
Email archiving engine rules- you can establish enterprise wide
rules but still allows users to create their own rules.
-
CRM Action Items
Once you publish a configuration for a specific role, each
user who is a member of this role will be forced to use this configuration.
Best Practices
It is highly recommended that prior to installing FrontEnd on users' desktops, you
install it first on your desktop and experiment with the settings to understand
how they work. Once you establish the desired settings for each role, publish
these configurations to the roles. Then send users the link to install the
software. Upon launching Outlook for the first time after installation, users
will be prompted with the following notifications:
If the user is a member of a single role and FrontEnd
detects a configuration for this role:
![]()
Role Configuration
Dynamically Modifying Configurations
You can modify each role's configuration and re-publish dynamically. Simply select
the role and click 'Load Configuration'. The configuration will be
loaded back and applied to your system. You can then make changes and
re-publish to the role(s). You can also use this mechanism to create a
configuration for one role, load it back, modify it and publish to another
role.
If you publish a new configuration to a certain role, users
who are members of this role, will receive it upon the next time they launch
Outlook.
It's important to understand which settings you can modify
dynamically and which settings can take effect only upon the first time that user
configure FrontEnd. Most of the settings can be modified dynamically except for
the following:
-
'Sync Configuration' settings under the 'Initial sync' section of
each object.
-
Email Archiving Engine rules
-
CRM Action items' lists
Each object has a section that contains settings that apply to
'Initial Sync'. These settings are used to determine which records should be
initially synced from SugarCRM to Outlook. Upon competition of the initial sync
they become read-only (except for administrators which may change them at any
time so they can be applied to configurations that they publish to roles).
For example, if you have configured to sync accounts that
have been created or modified within the last 3 months timeframe, this setting
will only be used once and even if you change it dynamically, it will not take
effect again unless users reset their configuration and re-initiate an initial
sync cycle.
![]()
Note: As an admin, the initial sync settings are always enabled on your
desktop in order to allow you to configure them for the purpose of creating and
publishing different configurations for roles, but if you have already went
through the initial sync on your desktop, any changes that you make to the
initial sync settings will not take effect on your own configuration.
Object Level Permissions
FrontEnd allows you to set objects-level permissions which objects can be
created or modified by users from within Outlook. These permissions are enforced
in addition to the native permissions you set per user on Salesforce that define
access and modification rights. In order for users to create or modify a record
of a certain object type bit sets of permissions need to be enabled. If you
disable permissions in FrontEnd only, users will still be able to create/modify
them directly on the CRM.
![]()
Managing User Licenses
As a Salesforce administrator, you have access to manage FrontEnd licenses for
your users (this functionality is only available to administrators):
![]()
You will be redirected to the Implicit FrontEnd licensing portal where you can:
-
Your corporate license information, start date, renewal date tec.
-
How many licenses are being used and by whom
-
The FrontEnd version that each user is using and since when
-
Re-assign licenses when users leave the company and other users join
-
Add user licenses
-
Renew your corporate license